Welcome to ELAM Solutions Helpcenter

All topics /
Categories /
Hardware & Tools
/
ELAM SMACO 8 (Smart Cordless Screwdriver)

ELAM SMACO 8 (Smart Cordless Screwdriver)

Published:
June 26, 2025
Updated:
June 26, 2025

This article explains how to connect an ELAM SMACO 8 (Smart Cordless Screwdriver) to ELAM via a Smart Work Assistant (SWA) 5 Client Wi-Fi. The screwdriver communicates with the SWA via a Wi-Fi connection using an OpenProtocol interface. The following sections will guide you through the process of setting up the Wi-Fi connection between the SWA and the screwdriver.

This link leads to the ELAM SMACO 5.

How to connect the ELAM SMACO 8 to a SWA5 Hotspot

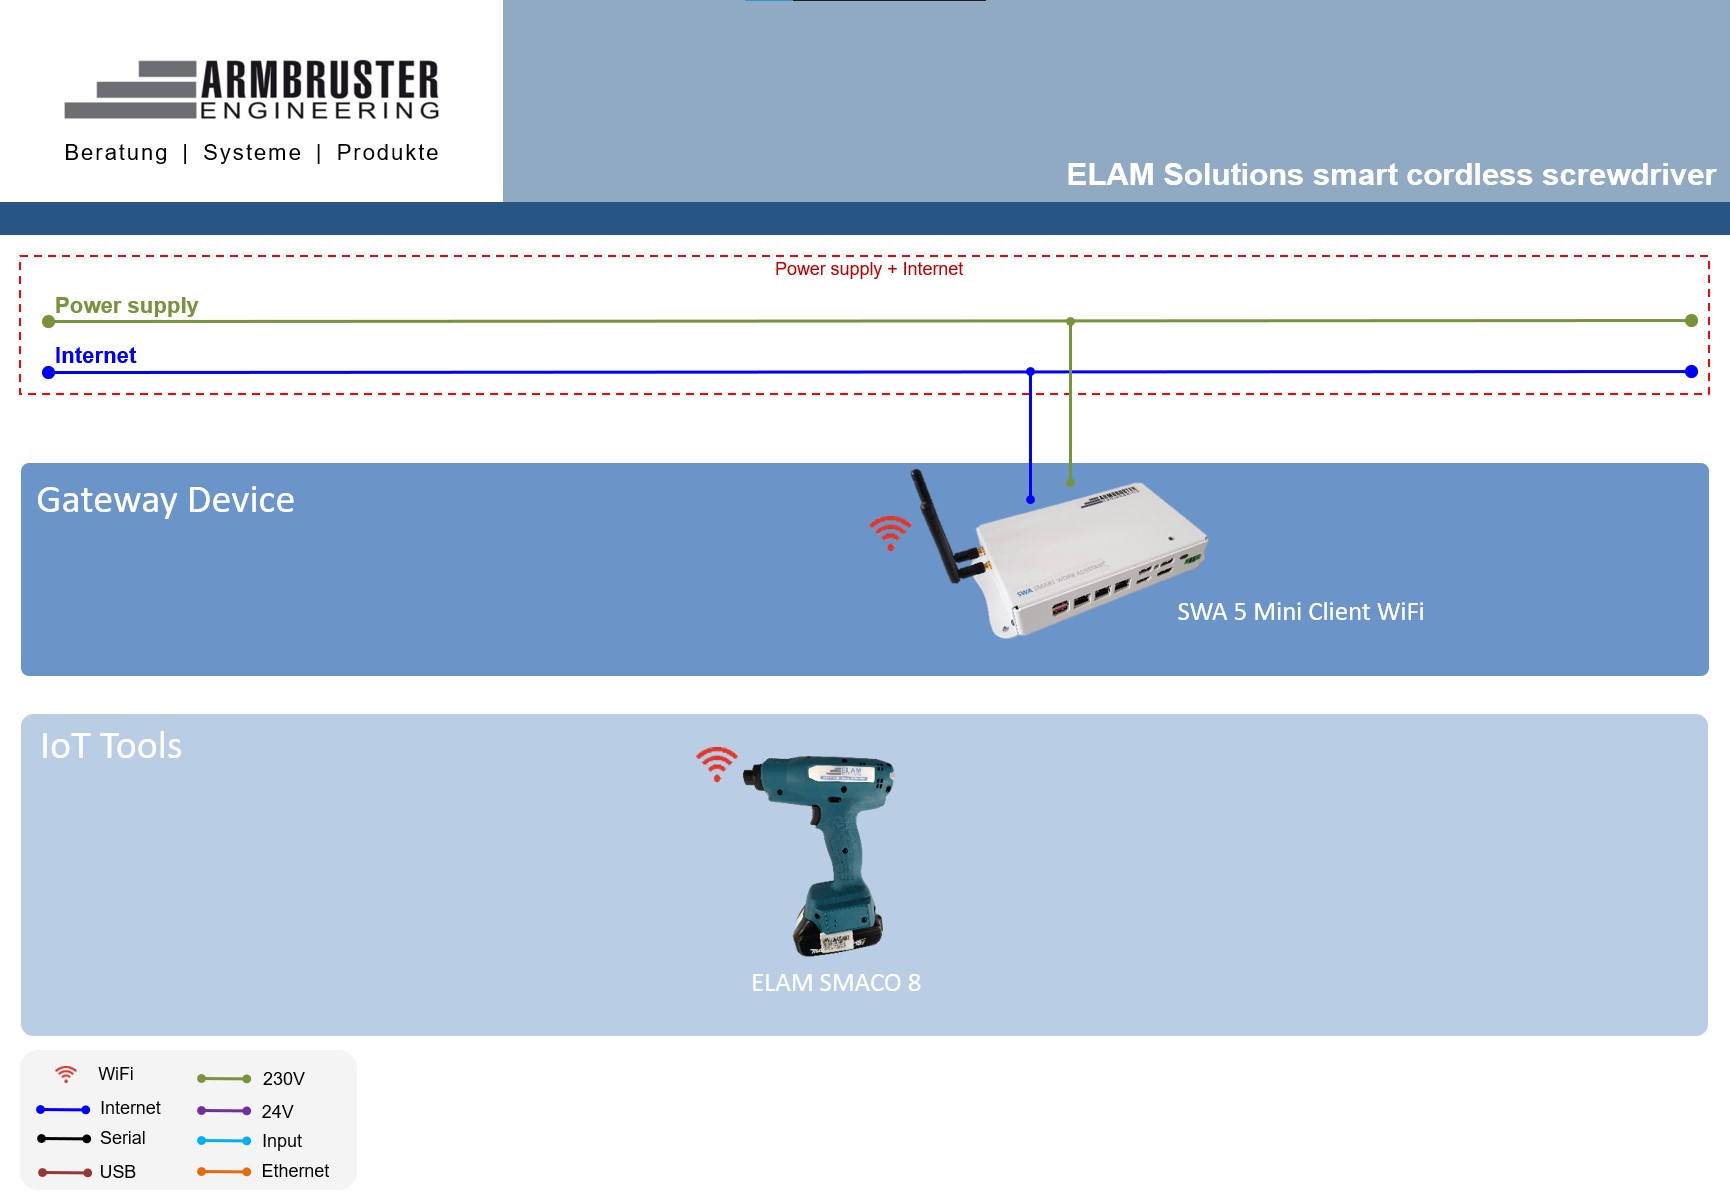
In this video, you will learn how to connect the ELAM Solutions Smart Cordless Screwdriver to an SWA5 hotspot.

To connect the Smart Cordless Screwdriver to a hotspot, the tool must be set to provisioning mode.
Follow these steps to activate provisioning mode:

  1. Remove the battery
  2. Insert the battery and immediately remove it again
  3. Reinsert the battery

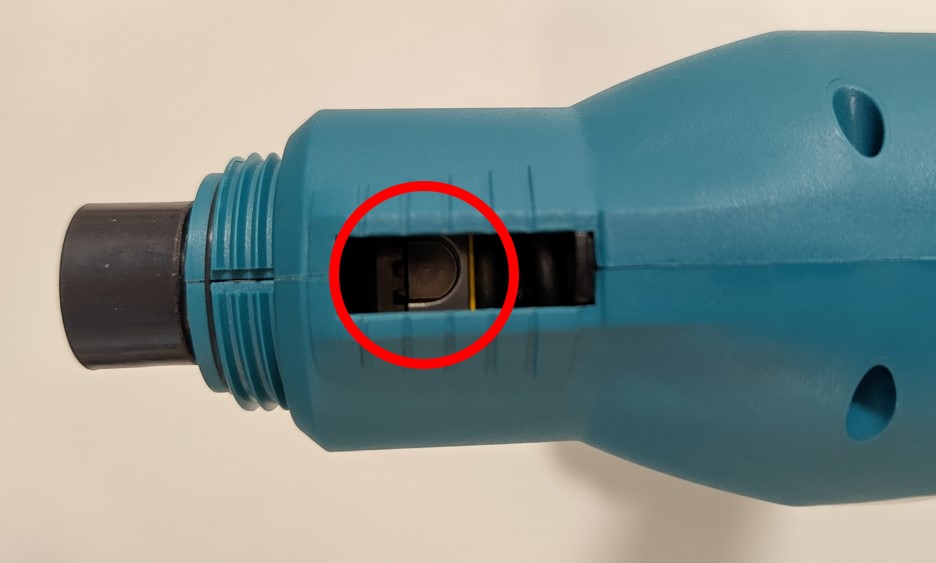
The screwdriver is now in provisioning mode. The status LED (on the back) lights up blue.

Important: If you remove and reinsert the battery while the screwdriver is in provisioning mode, it will restore its previous settings and attempt to reconnect to the last known Wi-Fi network.

When the tool is in provisioning mode, a hotspot must be selected to establish the connection.
To do this, it’s best to connect to the tool via Wi-Fi using a mobile device.

How to connect to the tool:

  1. Use any Wi-Fi-enabled device (preferably a smartphone or tablet) to connect to the hotspot named "ELAM-SCS-002-xxxxxxxxxxxx" (where xxxxxxxxxxxx is the MAC address of the screwdriver).
  2. Click on the device name to connect.
  3. Wait a moment for a browser window to open automatically.
  4. Once the web page loads, you will see a list of available Wi-Fi networks with an open connection.
  5. Select the Wi-Fi network of the SWA 5 Mini Client and enter its Wi-Fi password.
    By default, the Wi-Fi password is the serial number of the SWA, which can be found on the side of the device.
  6. Enter the password including hyphens in the following format:
    SWA-XXXX-XXXX-XXXX (Replace "XXXX..." with the actual serial number).
  7. Click the "connect" button to establish the connection.
    A message saying "Success" will appear if the connection is successful.
    If an error message appears, repeat steps 1–7.
Important: When the message "Success" appears, the tool is automatically added under ELAM Administration / Tools in your ELAM Solutions system. Newly added tools can always be identified by the fact that they do not yet have a station assigned. This station assignment usually needs to be configured by the user so that the tool can be used at the intended workstation.

The SMACO 8 in ELAM

When the screwdriver has successfully connected to ELAM, the status LED blinks magenta. To use the Smart Cordless Screwdriver in ELAM Solutions, you must assign it to a station.

Description of the status-LED

LED Farbe Status
Blau Keine Netzwerkeinstellungen gespeichert, Wi-Fi Proviosionierung benötigt
Gelb Keine Verbindung zum WiFi. Das Gerät versucht eine Verbindung zum eingestellten WiFi herzustellen.
Gelb blinkend Keine Verbindung zu Elam. Das Gerät wartet auf die Verbindung von einem Elam OpenProtocol Controller.
Magenta Keine Result Subscription empfangen. Das Gerät wartet auf den Empfang der Result Subscription (MID 60) vom Elam OpenProtocol Controller.
Cyan Keine Freigabe empfangen bzw. gesperrt. Das Gerät wartet auf den Empfang der Freigabe (MID 43) vom Elam OpenProtocol Controller.
Weiß blinkend Freigabe durch Elam OpenProtocol Controller erhalten. Das Gerät wartet auf die Verschraubung.
Weiß Verschraubung wird ausgeführt. Das Gerät wartet auf das Ende der Verschraubung.
Rot blinkend Der Akku des Gerätes ist (fast) leer.
LED aus Kein Akku eingelegt. / Akku ganz leer. / Gerät oder Akku defekt.

How to set the torque

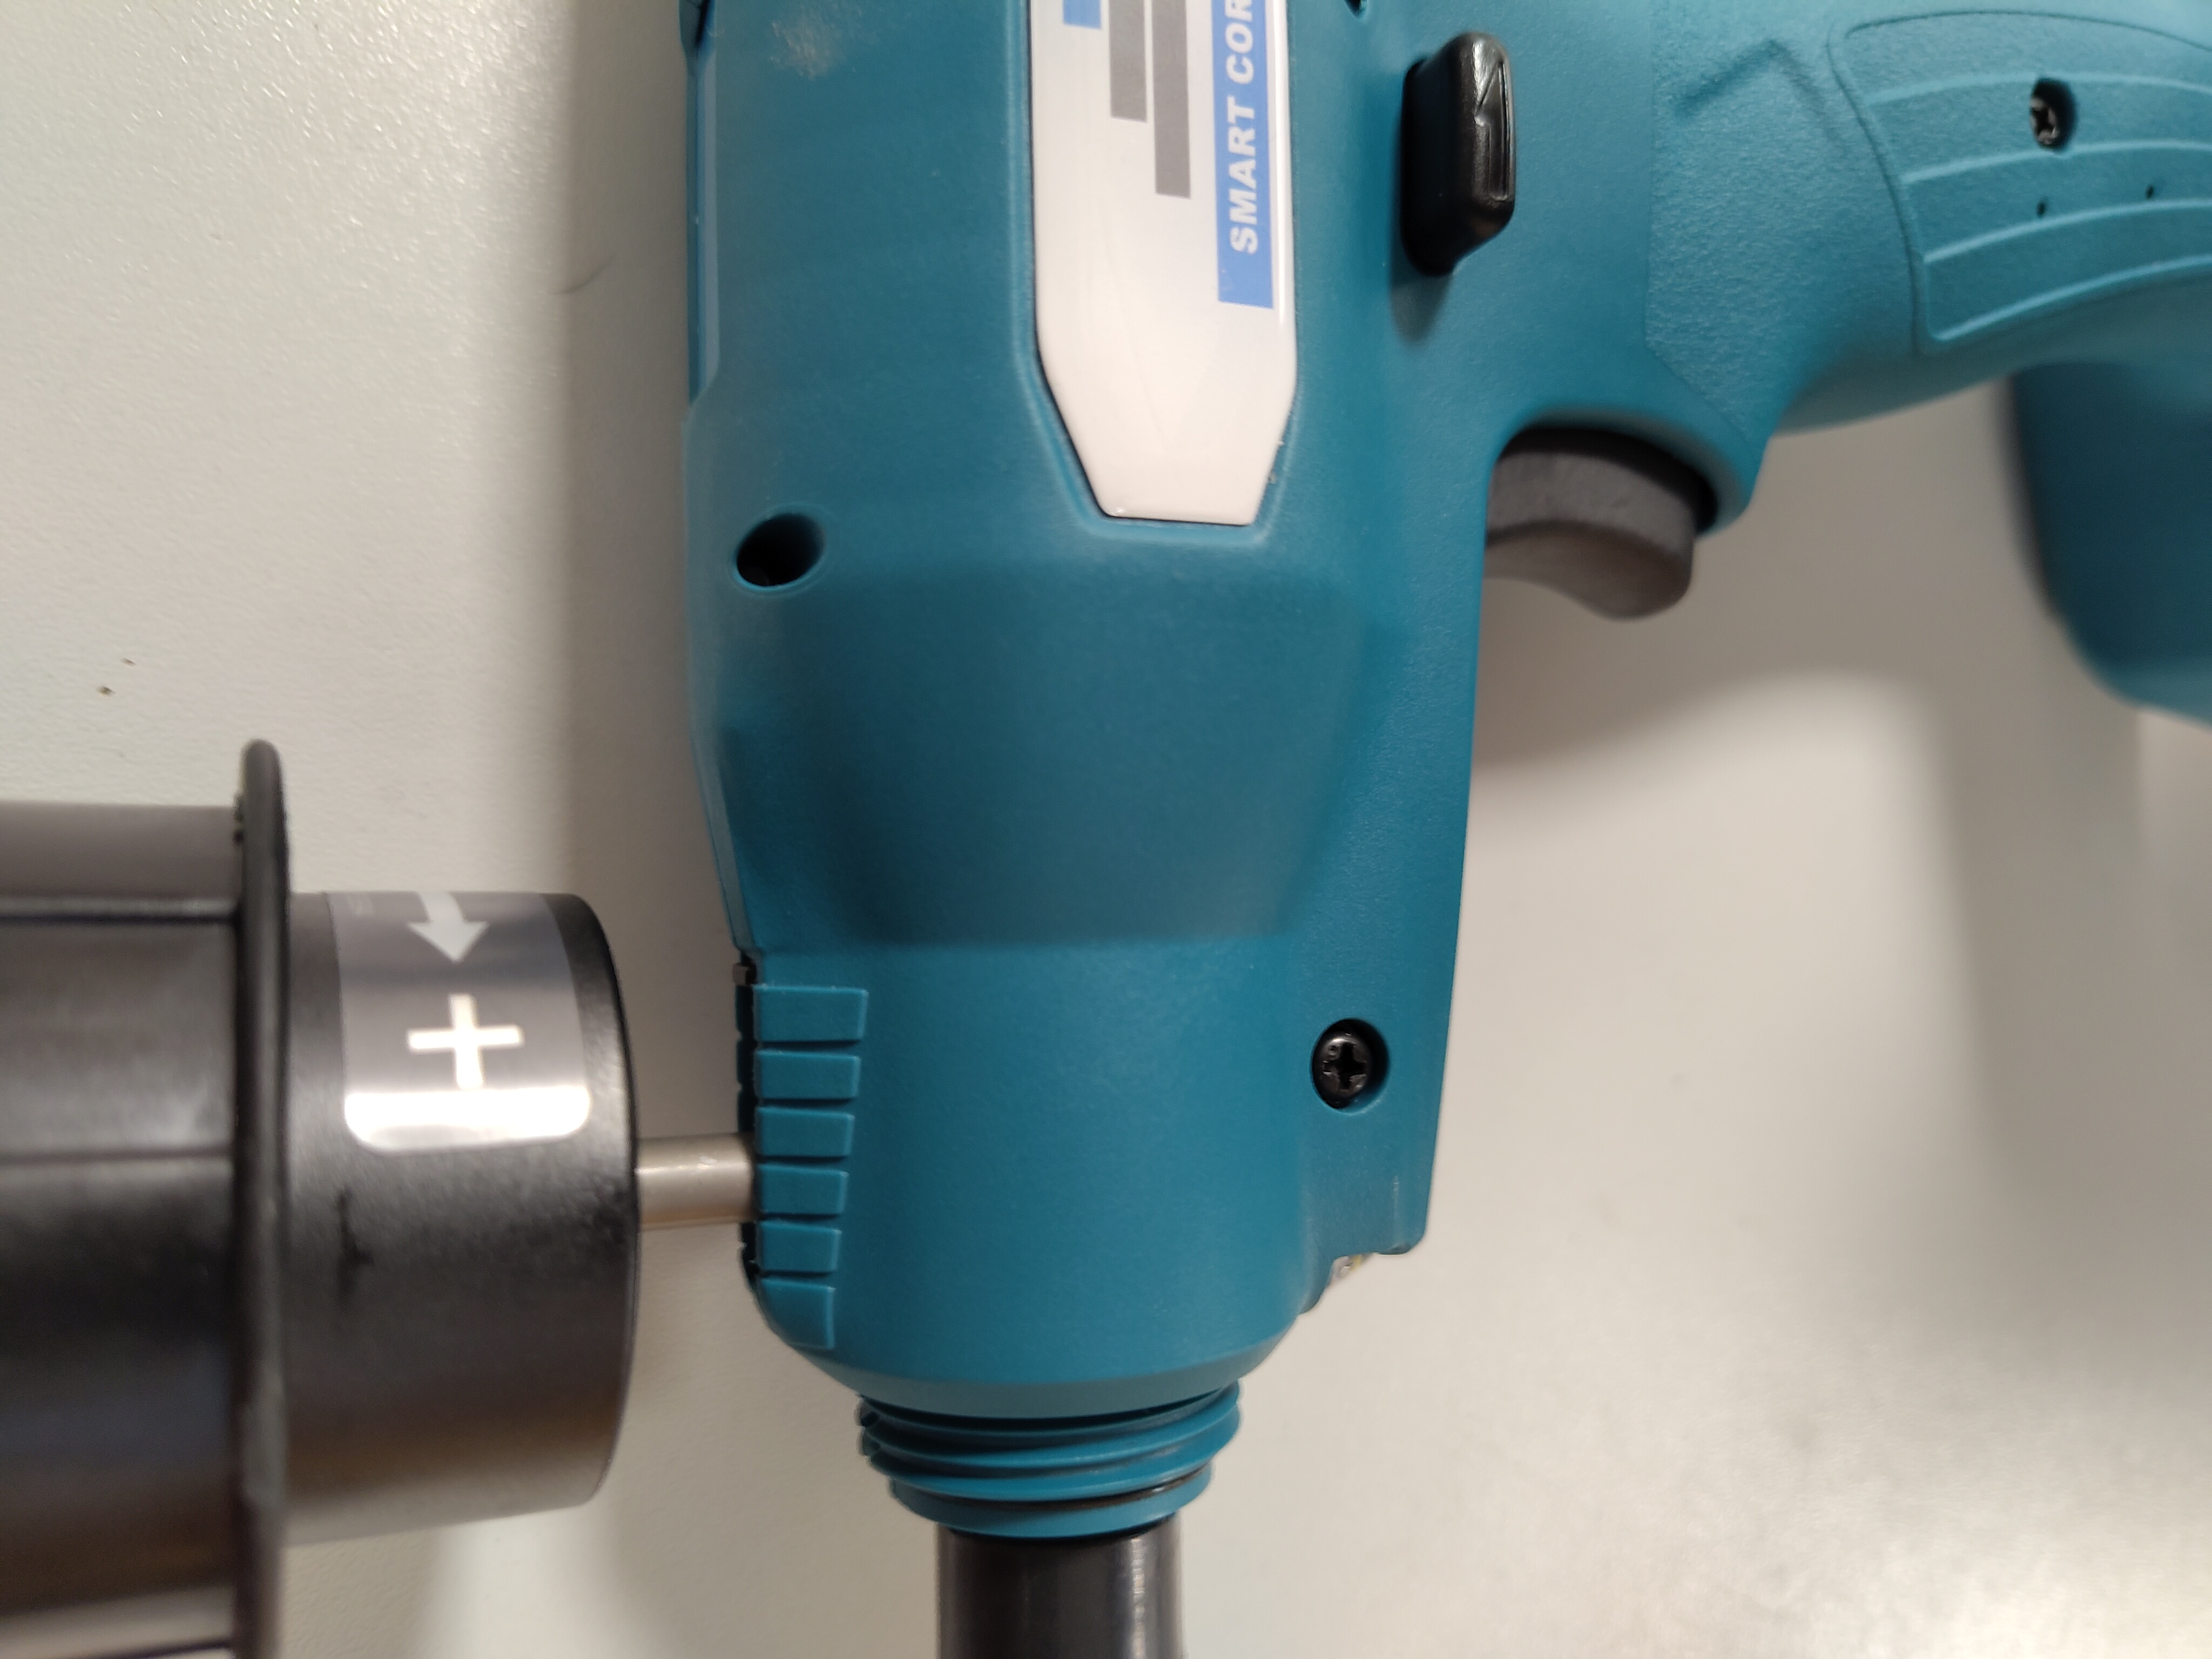
The torque range of the SMACO 8 is between 3 and 8 Nm. The torque can be adjusted flexibly using a tool.

Note: SMACO 8 with higher torque values are available on request.
Note: A torque measuring device is required to determine the exact torque.

To adjust the torque of the SMACO 8, a special tool from Makita is required. The procedure is described below:

  1. Open the front top slider on the SMACO 8.
  2. Rotate the screwdriver until the adjustment hole becomes visible.
    Note: The screwdriver may need to be enabled first to turn the adjustment wheel.
  1. Insert the tool and turn it. + increases the torque, – decreases it.
  2. The approximate torque setting can be read using the yellow mark and the markings on the screwdriver. The closer the mark is to the screwdriver body, the higher the torque.

Makita Industry Tool Settings Software

Additional settings can be made using the Makita Industry Tool Settings software. The procedure is described below:

  1. Start the setup and install the software.
  2. Launch the Makita Industry Tool Settings software.
  3. Click on “FT/FL series Screwdriver / Angle Screwdriver.”
  4. Connect the SMACO 8 with a battery inserted to the PC using a micro-USB cable.
  5. In the software, on the right side under “Access to the tool,” click “Read.”
  6. Change the desired settings.
  7. On the right side under “Access to the tool,” click “Write.”
  8. Disconnect the tool, remove and reinsert the battery.

FAQ/ Troubleshooting

The screwdriver has successfully connected to the Wi-Fi, but the status LED is flashing yellow

The status LED is flashing red
  • The battery is empty. Replace the battery with a full battery and charge the empty battery in the charging station provided.

After a battery change, the screwdriver is no longer working and the status LED lights up blue
  • Provisioning mode was activated changing battery repeatedly. Remove the battery and insert it again. The screwdriver automatically restores its previous configuration.

The screwdriver doesn't work anymore in an opened tightening step
  • When being idle for too long, the screwdriver loses the enable signal. The LED is lighting up magenta. Repeat the tightening step to re-enable the enable signal.